
How to Paint a Wall: The Complete Easy Beginner’s Guide
Painting a room is one of the quickest ways to make your home feel fresh and clean. Whether you are covering up scuffs in a hallway or trying out a brand-new colour in the lounge, rolling on a fresh coat gives you immediate results. However, anyone who has picked up a roller for the first time knows that small mistakes show up quickly. If you rush the job, you end up with streaky patches, rough roller marks, and paint peeling off skirting boards.
Learning how to paint a wall the right way comes down to basic trade habits. If you use the right tools, keep your edges wet, and take your time with prep, you can paint a wall like a pro on your very first try.
Essential Tools and Supplies to Paint Walls for Beginners
You do not need an entire trade van full of gear to get clean lines and smooth walls. Sticking to a few reliable, high-quality basics will make the work go twice as fast.
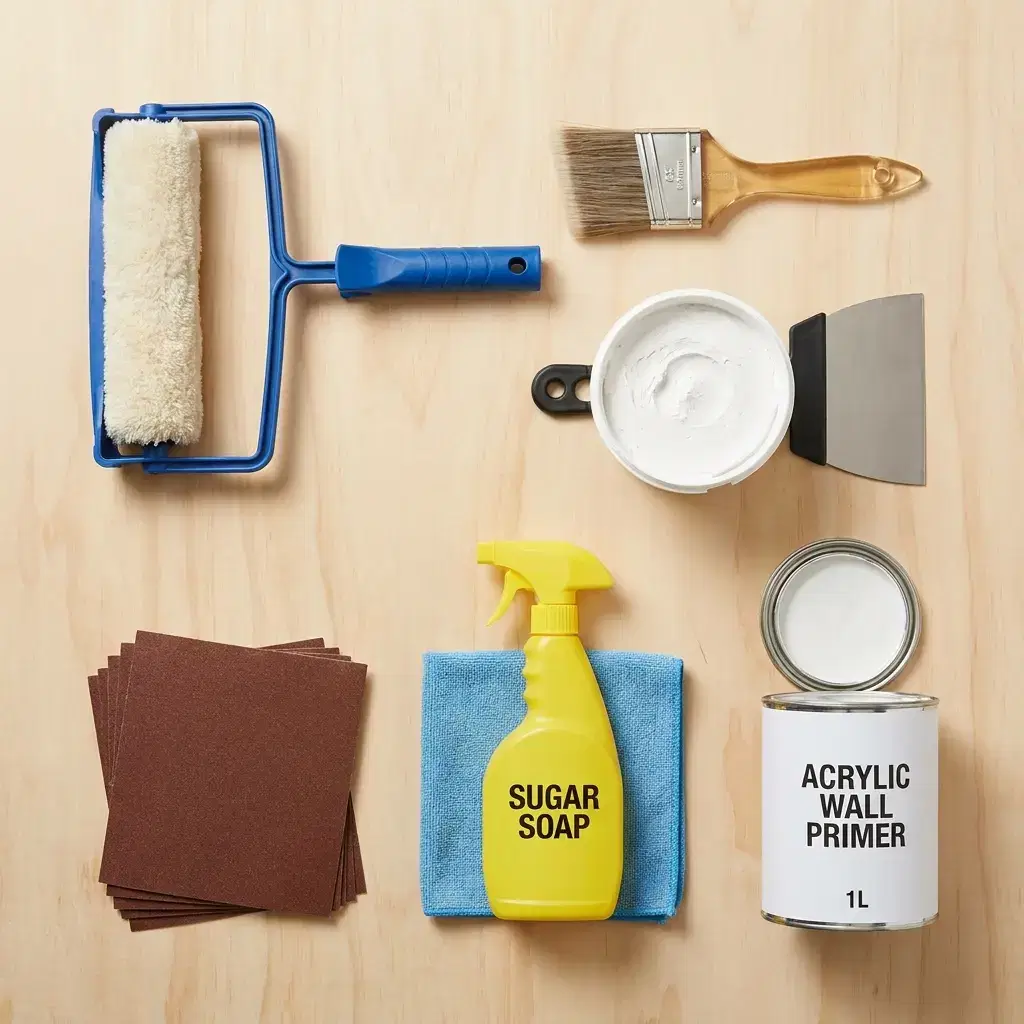
| Gear Category | Recommended Item |
|---|---|
| Cutting-In Brush | 50 mm or 63 mm angled sash brush |
| Roller Setup | 230 mm roller frame with 8–10 mm microfibre nap |
| Extension Pole | 1.2 m lightweight aluminium or wooden pole |
| Surface Preparation | Sugar soap, microfibre cloth, 220-grit sandpaper |
| Patching & Sealing | Interior filler, broad knife, acrylic wall primer |
| Floor Protection | Heavy-duty canvas drop sheets, blue painter’s tape |
1. The Right Brush and Roller
Cheap brushes shed loose bristles into your wet paint, and cheap rollers leave thick, fuzzy lint across the wall.
2. Choosing Your Paint and Primer
For general living rooms, hallways, and bedrooms, a low-sheen water-based acrylic is the ideal choice. Low-sheen finishes hide minor plaster imperfections while remaining durable enough to wipe clean with a damp cloth.
If you are painting over clean, previously painted walls of a similar shade, you can usually apply two topcoats directly.
You only need a dedicated acrylic primer-sealer if:
Step 1: Room Setup and Surface Preparation
Professional painters spend at least half their time getting the room ready. Taking 30 minutes to set up properly saves you hours of frustrating cleanup later. Proper surface preparation is also essential for achieving a smooth, long-lasting finish.
Start by pulling all furniture at least 1.5 metres away from the walls and cover it with dust sheets. Lay heavy canvas drop sheets across the floor along the base of your walls. Canvas stays flat and absorbs wet paint drops, while plastic sheets bunch up and become dangerously slippery.
Next, take a screwdriver and remove all light switch plates, power point covers, and heating thermostat faces. Unscrewing these covers takes two minutes and guarantees clean lines without messy tape marks.
Wash Away Grease and Dust
Walls collect invisible grease, dust, and body oils around door frames and switches. Paint cannot grip dirty walls.
- Mix a bucket of warm water with a splash of sugar soap.
- Wipe down the entire wall surface with a cellulose sponge or microfibre cloth.
- Rinse the sponge in clean water, wipe the wall again to remove soap film, and allow the surface to dry for roughly one hour.
Patch Small Holes and Sand Flat
Inspect the wall closely with a side light. Use a 100mm broad knife to press interior stopping compound or fine surface filler into nail holes and small dents.
Once the compound dries (usually 1 to 2 hours), sand the patches flat using 220-grit sandpaper. Run your bare hand over each repair; if you feel a ridge or bump, keep sanding lightly. Wipe away the white sanding dust, then dab a small amount of acrylic primer over the bare filler so it does not soak up your topcoat.
Step 2: How to Cut In Around Edges and Corners
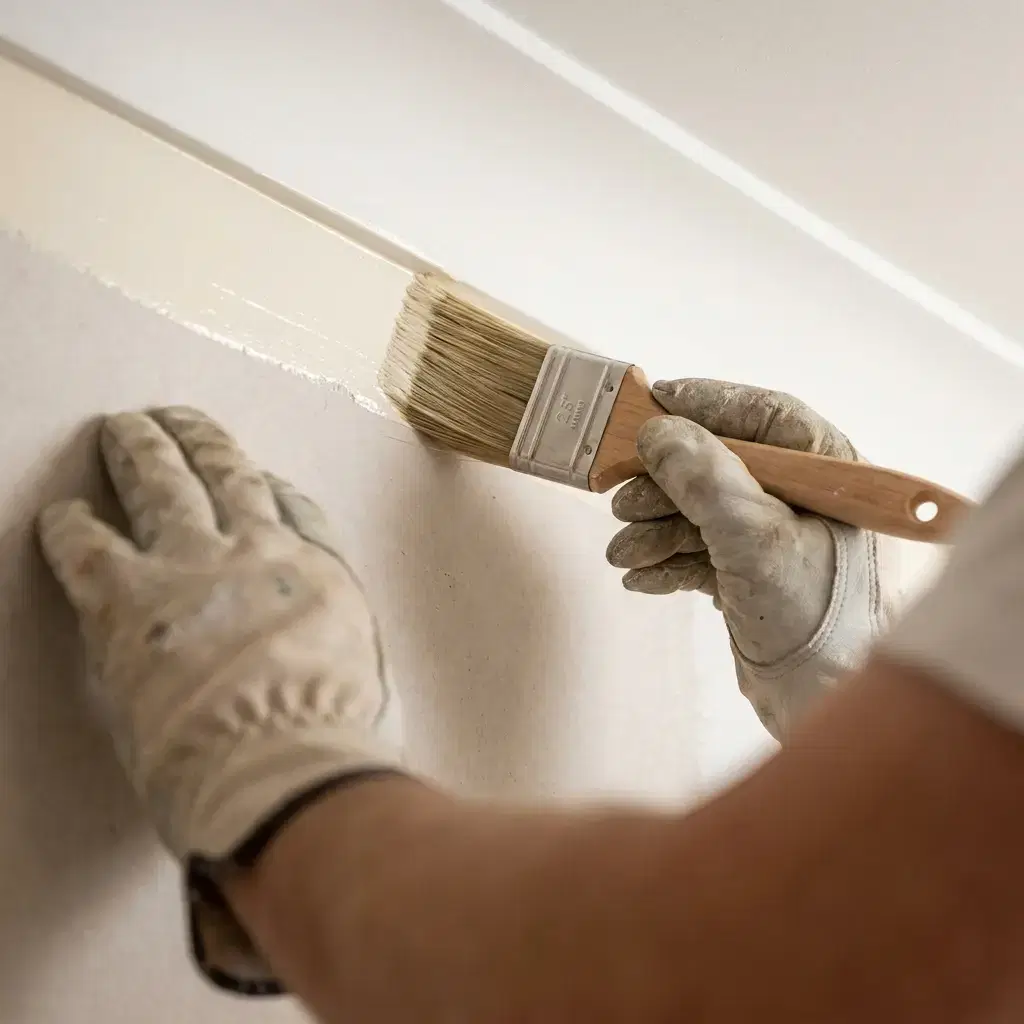
Cutting in simply means using a brush to paint a 50mm to 75mm band along the areas where a large roller cannot reach. This includes ceiling lines, internal wall corners, and the edges around skirting boards and door frames.
To cut in neatly without dripping:
Hold the brush down near the metal ferrule just like a pencil. Place the bristles against the wall roughly 5 millimetres away from your ceiling line. As you press gently, the bristles will fan out to form a straight edge. Draw the brush along the line in a steady, smooth stroke.
Wall Painting Process
1. Cut In Top and Corner Edges
2. Roll a 1-Metre Section in a “W” Pattern
3. Fill In the Section Using Vertical Strokes
4. Lightly Lay Off the Paint from Top to Bottom
5. Move Immediately to the Next Section
The golden rule when learning how to paint a wall is to cut in and roll one wall at a time.
If you cut in an entire four-walled room first, that brushed paint will dry completely before your roller touches the wall. Rolling over dry cut-in paint leaves a visible border known as “picture framing.” Working one wall at a time allows the wet roller edge to melt seamlessly into the wet brushed edge.
Step 3: How to Paint a Wall with a Roller (The Pro Technique)
Once your cut-in line is finished on the first wall, pick up your roller straight away to maintain your wet edge.
1. De-Fuzz and Load the Roller
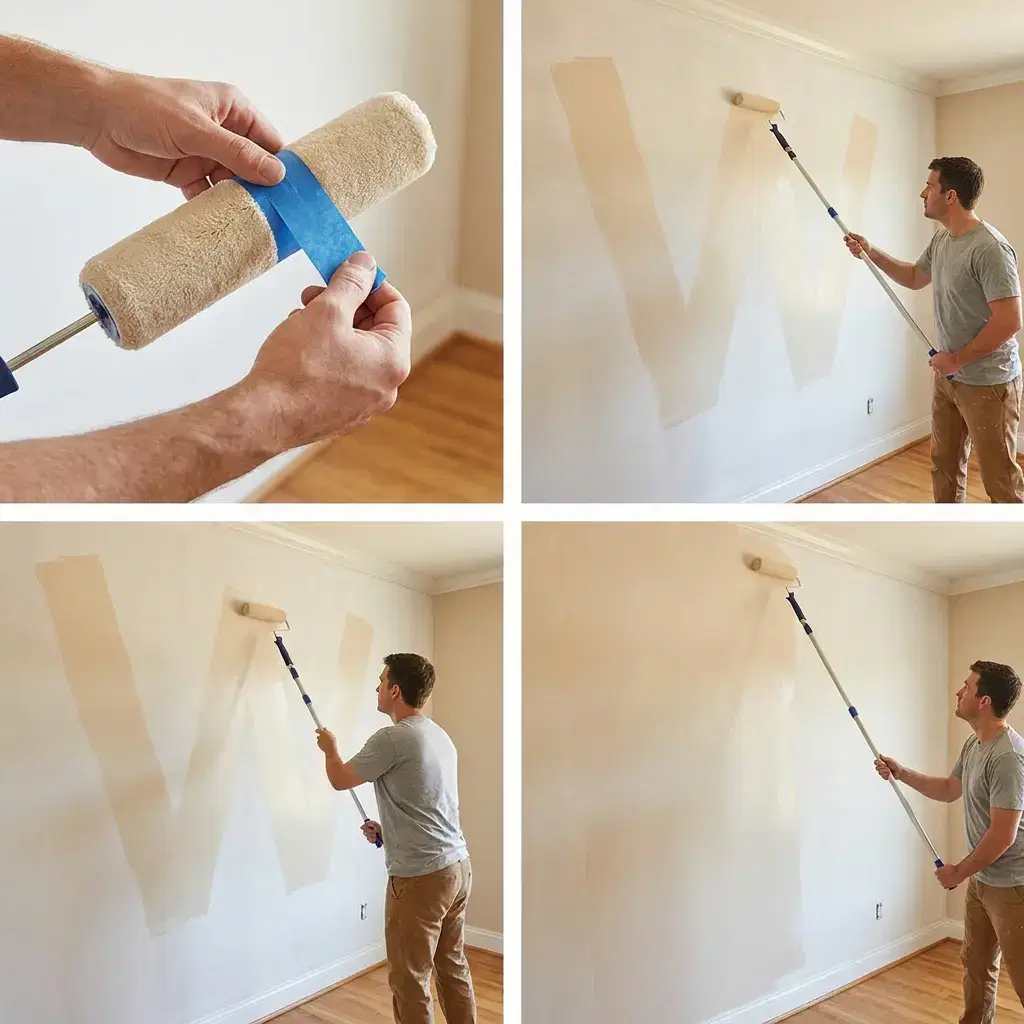
Before dipping a brand-new roller sleeve into paint, wrap a strip of painter’s tape around the sleeve and pull it off. This removes loose manufacturing fibres so they do not end up stuck to your fresh wall.
Pour paint into the deep end of your roller tray. Dip the sleeve in slightly, then roll it back and forth along the textured tray ramp 5 or 6 times. The sleeve should be fully soaked with paint without dripping or pooling in the core.
2. Distribute Paint Using the “W” Motion
Place your roller against the wall roughly halfway between the floor and ceiling. Roll upward first, spreading the paint across a 1-metre by 1-metre section in a large “W” or “M” pattern.
This initial pass unloads the heavy bulk of the paint evenly across the section instead of dumping a thick puddle in one spot.
3. Fill and Blend
Without lifting the roller from the wall, fill in the open gaps of your “W” using steady vertical strokes. Work with moderate, even pressure.
Never push hard on the roller handle to squeeze out the last drop of paint. Forcing paint out of a dry roller creates thin spots, ridges, and roller splatters. As soon as you hear a sticking, tacky sound from the sleeve, reload it with fresh paint from your tray.
4. Laying Off for a Streak-Free Finish
To get a completely uniform, professional look, you must “lay off” the paint while it is still wet:
- Hold the roller lightly against the top of the freshly painted 1-metre section.
- In one smooth, continuous stroke, glide the roller straight down from the ceiling line to the skirting board.
- Use barely any hand pressure, just letting the weight of the roller lightly smooth out the stipple.
- Move across the wall, overlapping each downward stroke by roughly 50 millimetres.
Repeat this process across the entire wall, overlapping into your wet cut-in lines until the wall is completely covered.
Step 4: Applying the Second Coat
One coat of paint is never enough. Even if the coverage looks solid from across the room, single coats leave thin areas that look patchy under natural window light. Two coats are required to get the true, rich depth of colour and to build a washable surface that resists scuffs.
Wait 2 to 4 hours for your first coat to dry completely. If the room is cold (below 12°C) or humid, give it closer to 4 hours so the paint film cures properly.
Apply the second coat using the exact same sequence: cut in the edges first, roll your 1-metre sections, and lay off vertically from top to bottom.
DRYING TIMES & REMOVAL CHECKLIST
| Step | Recommended Time / Instructions |
|---|---|
| First Coat Touch-Dry | 1 to 2 Hours |
| Recoat Window | 2 to 4 Hours (Wait for full dry) |
| Masking Tape Removal | Peel at a 45° angle while the second coat is tacky |
| Full Cure & Washable | 7 Days (Do not scrub or wash walls early) |
If you used painter’s tape along skirting boards or door trims, peel it away while your second coat is still slightly tacky. Pull the tape back slowly against itself at a sharp 45-degree angle. This cuts a clean, crisp paint line without tearing away the fresh coating.
Common Wall Painting Mistakes to Avoid
| What Goes Wrong | The Underlying Cause | How to Fix It |
| “Picture Framing” Lines | Cutting in the whole room hours before rolling | Cut in and roll one wall at a time to keep edges wet |
| Roller Tracks and Ridges | Pushing too hard on an empty roller handle | Reload paint regularly and lay off vertically with light pressure |
| Dull Spots on Walls (Flashing) | Rolling topcoat over unsealed plaster filler | Always spot-prime bare filler with an acrylic sealer first |
| Rough, Bumpy Wall Texture | Using a long-pile exterior roller sleeve inside | Use an 8mm to 10mm microfibre sleeve designed for plasterboard |
| Peeling Along Trim Lines | Leaving painter’s tape on the wall for days | Pull tape off at 45 degrees while the final coat is still tacky |
When to Bring in Professional House Painters
Painting a single flat bedroom wall is a great weekend DIY project that anyone can complete with a bit of patience.
However, interior painting becomes tricky once you deal with whole-house renovations, high stairwell walls, or large open-plan living rooms with expansive sliding glass doors. In big rooms, bright direct sunlight (raking light) highlights every tiny brush mark and plaster joint. Achieving a completely level, blemish-free finish across broad surfaces requires commercial spraying gear, dustless sanders, and years of daily hand-rolling technique.
At Capital Painting Services, we take the stress out of home decorating across Porirua, Whitby, the Kapiti Coast, and the wider Wellington region. As Dulux Accredited painters and certified Site Safe members, Phil and his team deliver smooth plaster repairs and flawless interior finishes using premium New Zealand paint systems. If you’re taking on a larger project, our professional house painters in Porirua can help you achieve a clean, durable finish without the hassle.
If you are planning an upcoming home refresh and want durable, professional results without spending your weekends on a ladder, contact our friendly team today for a free on-site consultation and quote.

